Tuesday, February 12, 2013

Brew Day

I've started an article series on homebrewing your own beer. I called it "Febrewary" because I'm clever like that. In our last episode, I covered some of the basics of starting to brew your own beer at home.

The kit arrived, now what?

Okay, this is easy. Just follow the instructions. For brew day, you'll need your kettle, scissors, fermenter, threaded stopper, airlock, siphon, hose, beaker, a big spoon, the recipe kit, and sanitizer.

Sanitize all the things

The first step in any brewing operation is to sanitize everything. EVERYTHING! We're dealing with yeast here, a living organism. We spent good money on a particular species that is specially chosen to give us good results in our recipe. Don't screw it up by letting some other bacteria species get in there.
Use the no-rinse sanitizer that came in the kit; one tablespoon of sanitizer into one gallon of water. Don't drain this because you might need to sanitize something again later.

All clear

This next stage will vary based on your beer recipe.  For this demonstration, I've gone with the Northern Brewer's Irish Red. As per this recipe, bring one and a quarter gallons of water to a boil and steep the specialty grains in the included mesh bag.
Many breweries say that the water they use in their operation affects the flavor of their brew and they're right. You can use specially filtered water but I use plain old tap water. The local municipal water supply here is a bit heavy but I like to think that particular blend of minerals and metals give my brew a flavor that can't be copied. But the truth is that if it's okay to drink then it's okay to brew with.
If you do garden composting like I do, you can put the grains in the compost after they're done steeping. After this, stir in the malt extract and the hops. This is a beginner recipe kit so it uses extract, but as your skills improve you can switch to all-grain recipes if you'd like.

Wake up, ye beasties

In this Irish Red recipe, the extract and hops boil for 45 minutes without adding more ingredients.  Lets use this time to activate the yeast. For some reason, the recipe only uses half the yeast it comes with.  Obviously, it's the way it comes from the supplier so save half for beer bread and pour the rest into a quarter cup of warm water in your sanitized beaker.

Begin transferrence

Clowns to the left, jokers to the right
After the wort (that's unfermented beer) has boiled, we need to cool it down to add the yeast.  The yeast likes its water about 70 degrees Fahrenheit. We'll do this with an ice bath. One basin in your sink is still full of sanitizing water so fill the other side with water and ice and put the kettle in.
The general idea
After the wort has cooled, it's time to add the yeast and move it to the fermenter. Pour the yeast into the wort, either in the kettle before the transfer or into the fermenter afterwards. Drain the ice bath, lift the kettle onto the counter, and put the fermenter in the sink. That difference in altitude will help the siphon. Follow the instructions to assemble and operate the siphon.

Transfer complete

pop lock
Now install the threaded stopper and airlock onto the fermenter and put it in a quiet corner. The yeast will do their thing converting sugar to alcohol and the positive pressure in the airlock will release carbon dioxide while keeping other bacteria out of the mix. In roughly two weeks, the yeast will be done and CO2 release will slow or stop completely.

Kick up the jams

All that's left is to clean everything and put it away. Now kick back with the craft brew you bought when you were gathering supplies so you have empty bottles for bottling day. Drink responsibly and enjoy!

Trademarks are properties of their respective owners.  Products featured or linked here are used as examples only, without endorsement or commercial consideration.

Monday, February 11, 2013

Gathering Supplies

I've started an article series on homebrewing your own beer.  I've called it "Febrewary" because I'm clever like that.

Is it legal?

Yes, homebrewing is legal!  This wasn't always the case of course.  In 1920, one of the worst laws to ever be put on the books arrived in the form of the Eighteenth Amendment which, along with the Volstead Act, lead to the dark times known as Prohibition.  All production of alcohol was illegal, leading to massive job loss and the rise of organized crime.  The Twenty-first Amendment, in 1933, saved what was left of the American beer industry but the damage was already done.  
While Prohibition had ended, it still wasn't officially legal to brew your own beer yet.  Wine making was legal but through an omission, "and/or beer" never made it into law.  We had to wait until 1979 for the Federal Register to be corrected and allow beer production.  

Is it expensive?

No, not at all.  Many starter kits, with everything you need for a first batch of beer, are available at affordable prices.  You don't have to buy the kit I linked to but that's the one I have so that's what I'll be using for this demonstration.  In addition to the equipment in a starter kit like the fermenter and capper, you'll need to add your own kettle and a few common kitchen implements.  

Everything you see here

What do I need?

I started with that kit linked above.  It includes the fermenter, threaded stopper and three-piece airlock, sanitizer, auto-siphon, and hose.  Also included in the kit was a bottle filler, capper, and bottle caps.  Of course, this kit also includes your first recipe.  I went with the Irish Red.  I really only had to add my own kettle, scissors, and beaker.  

Is that all?

Not yet, just one more thing, but you'll like this.  You need to get a dozen empty beer bottles.  You can buy them from your brewing supply house but there's a better way.  Get a dozen-bottle variety case of your favorite craft beer.  You see where this is going.  Drink it responsibly between brewing day and bottling day. Soak the empties in warm water to remove the labels; brown glass bottles with non-twist-off caps are preferred.  Now you have everything you need for your first batch.  Enjoy!

Trademarks are property of their respective owners.  Products featured or linked here are used as examples only, without endorsement or commercial consideration.  

Sunday, February 10, 2013

FeBREWary

I've been homebrewing my own beer and mead for a few batches now and I though "Febrewary" would make a good play on words for a new month-long series on homebrewing.  Yes, I am easily amused by my own cleverness.
So this article is just an introduction to the series and a way to increase my post count without really trying.  I'm an engineer, I'm all about getting a solution without really trying.

Wednesday, January 30, 2013

A Supportive Letter to Boy Scouts of America

As many of my readers, and anyone who looks at my profile, already know, I am an Eagle Scout and currently a unit leader in Arizona. Boy Scouts of America is in the news lately for an upcoming policy change at the national level. This change would remove the national membership restriction regarding sexual orientation and would leave membership policies up to the unit's chartering organization. There are many ways to register your support for this long-overdue policy change.

I wrote this letter to them in support:

Good afternoon, I am writing today to register my support in ending the ban on homosexual scouts and volunteers. The strength of this organization, and its ability to develop strong leaders, is the variety of viewpoints and activities to which scouts are exposed. These boys will succeed in the future, as everything from tradesmen to executives, by their ability to work with and lead diverse organizations. These early experiences of inclusion and support will prepare them well for the future. I urge you to follow through and support inclusion and diversity at all levels.

Yours in Scouting,

Michael K. Rainey
Venture Advisor, Crew 444
Assistant Scoutmaster, Troop 444
Catalina Council

Be Prepared

Tuesday, December 11, 2012

Samsung Galaxy S 3 First Impressions

Continuing with my series of first impressions reviews of the devices I purchase, I present the Samsung Galaxy S 3.  I had actually ordered this phone several months ago and scored it while Verizon was still offering to grandfather in unlimited data plans.  And so far I've been generally happy with this new device.  Success measured by how many coworkers bought a Galaxy S 3, especially after having recently "upgraded" to something else.

Hardware

My previous exposure to Android powered phones was the Motorola Droid.  With an ARM Cortex A8 processor and 16 GB memory, it was definitely not a slouch in the hardware department when it came out.  This phone had a processor and memory that challenged the capabilities of my first desktop computer in college.  The Samsung Galaxy S 3 posts numbers better than twice as high as the OG Droid.  Memory is expandable to 64 GB and the form factor is nearly an inch larger on the diagonal.

Software

Two versions of Android later, the difference is noticeable.  Also noticeable is the change from Motoblur to Samsung TouchWiz.  Having never seen pure Android UI I can only make the comparison from one manufacturer's interface to another.  Google has built in and standardized a great deal of functionality into the operating system while allowing manufacturers ample leeway to differentiate their product; not always for the better.
I don't like most of Samsung's software on this phone.
The saving grace is that, under Android 4 and above, you the user can disable any application you want, including most of Samsung's proprietary code.  In fact I've done this with many apps, killing the original calendar, music players, and S Voice, along with some other bloatware.  Sorry Amazon Kindle app and Facebook; you're gone.  Fortunately, as an Android phone, the Galaxy has full access to the Google Play Store, where I was easily able to replace and expand the phone's built-in software.

Final word

While I like the Samsung Galaxy S 3, even as a replacement to the Motorola Droid, it has some issues but is still a guaranteed upgrade.

Buzz Off

Provided there is no allergic reaction, the first aid for a bee sting is simple. Quickly remove the stinger by scraping with the back edge of a blade or card.  After that, treat the injury as you would a puncture wound.  That is, wash with soap and clean water.  Because of the injected venom an insect sting can quickly become complicated.  In severe cases it can cause a condition known as anaphylaxis.  This life-threatening condition is characterized by a whole-body allergic reaction including hives and difficulty breathing.

Luckily, I am not that susceptible to bee venom.  But my minor allergic reaction to getting stung last summer means I am at increased risk of anaphylaxis in the future.  I was at summer camp at Camp Fiesta Island, San Diego, CA, the week of 4 July with my Boy Scout troop.  For the rest of this article, I present my point of view of an injury and its treatment.

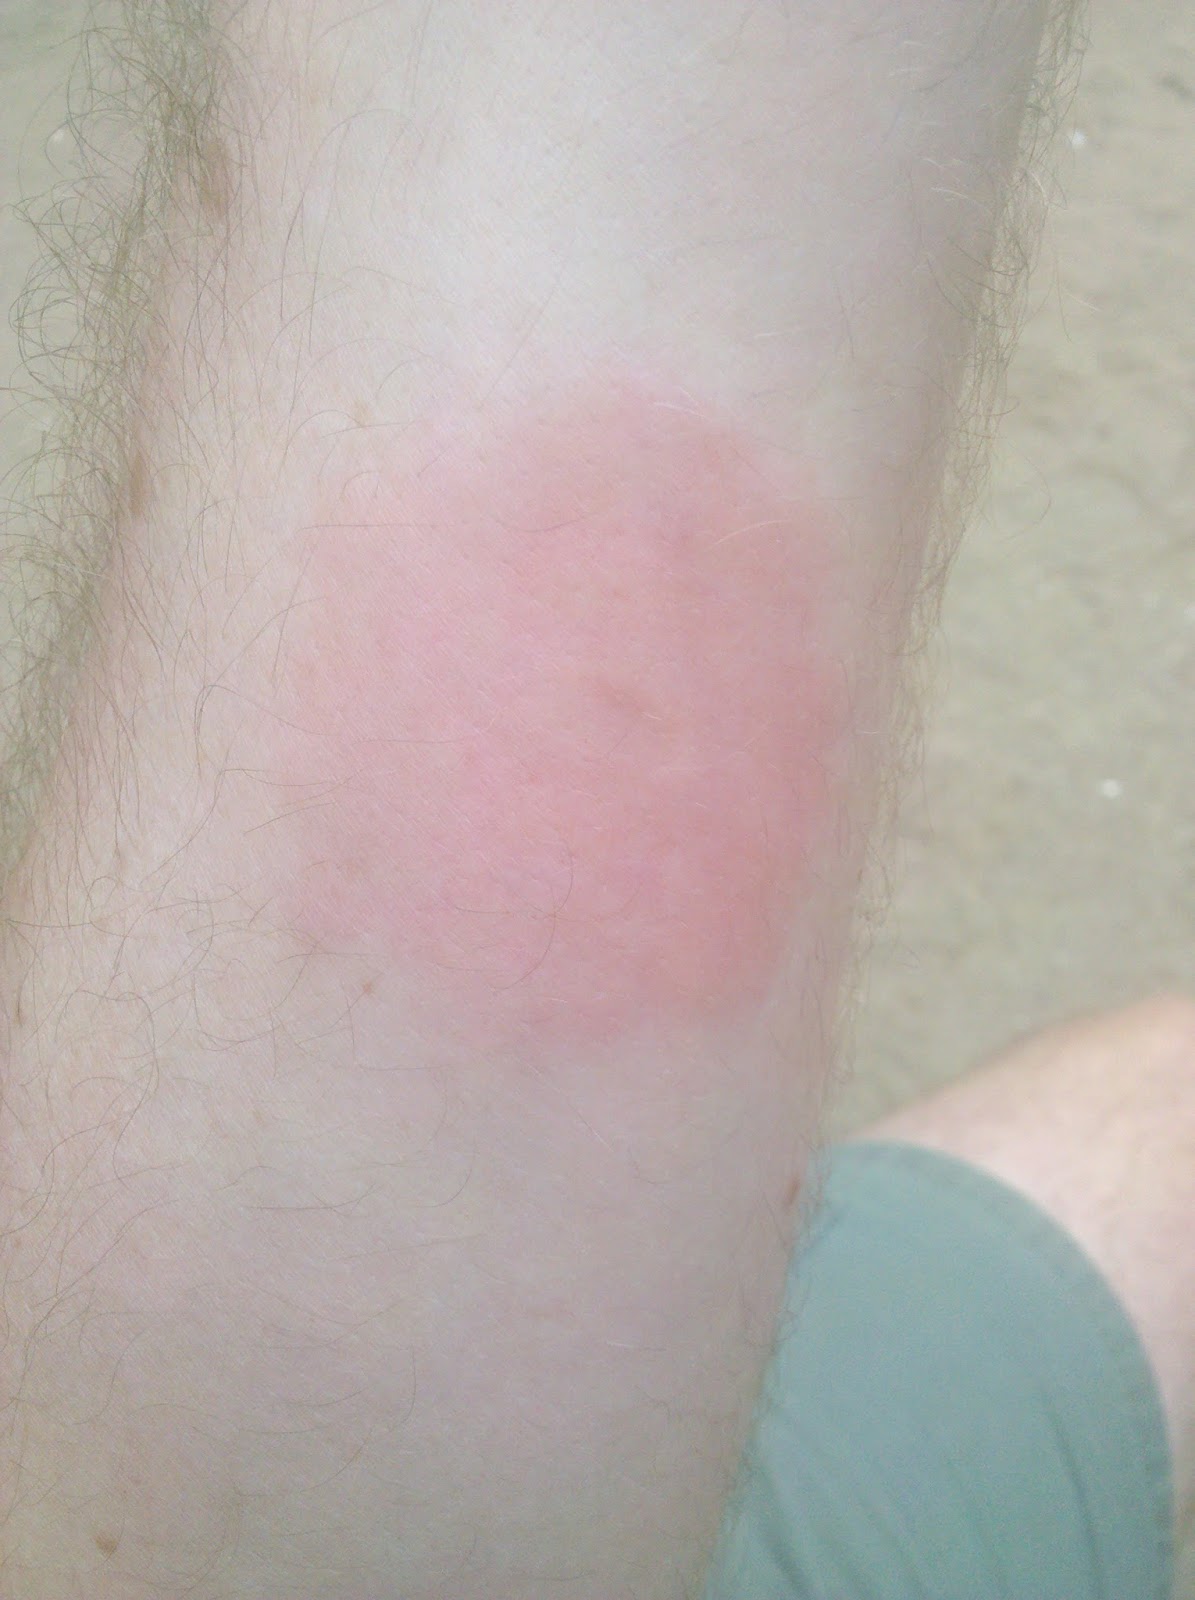
Here is a picture from immediately after the bee sting.  To give the viewer some perspective, that is my left forearm above a table.  The bee sting is the reddening spot on the right (underside) of the arm.  This bee had discovered a nice place to rest in a fold of my T-shirt when I brushed my arm against her.
Bee sting is on the side of the arm. Picture taken immediately after impact.

I knew this was a relatively minor injury for me and cleaned my arm after scraping out the stinger.  Then I watched for allergic reaction and was prepared to treat for shock.  As it happens, the bee sting did lead to an allergic reaction.  I treated the symptoms with calamine lotion to control the itching and antibiotic lotion to prevent infection. 
One day after I attacked a resting bee.

The venom spread slowly, as it does, through the muscle tissue in my arm.  It looked the worst several days after the attack.  
Bulls eye.  Three days later.

After about a week, I still had a bruise from the tissue damaged by the venom but had otherwise recovered.  It's important to note that I was not grievously injured here.  Bees leave only small puncture wounds but can cause serious allergic reactions.  This is clearly an allergic reaction but it is minor.  
Just a bruise.  

Thursday, November 8, 2012

All Hallows' Eve

Reign of Fire
Spyglass Entertainment Group
I'm going out for Halloween this year and I've decided what my costume is going to be.  I'm going as Denton Van Zan from the 2002 movie Reign of Fire. And here's how I made my costume.

The Vest

In the movie, Van Zan wears a heavily modified B-3 aviator jacket.  Credit goes to the keen eyes at Filmjackets.com for solving this one.  However, I really don't want to spend $1000 on a jacket in order to destroy it.  Fortunately, I found this bomber jacket on Amazon.com for $99.  At one tenth of the price, I'm much more comfortable cutting this one up to make it look like the movie prop.  
In order to craft my replica, I'll need a seam ripper and a speedy stitch. The sleeves come off with a bit of work, along with the buckle around the neck.  This jacket only has the one buckle so I'll just make two buckling epaulets and attach them to the shoulders.  If I had used the authentic B-3, I could use both included buckles but, as discussed, that's just not an option.  I also need to add two flat pockets to the front of the jacket, which will go on right on top of the existing pockets.  The American flag patch gets stitched on the left breast as shown in the pictures.  Simple as that.

The Rest of the Clothes

Gearing up
Nothing much to this part.  The rest of Van Zan's clothing, from the shemagh down to the boots, is military surplus.  Luckily, I live in a military town and we have an active surplus market at the MI Store.  I was able to get most of the costume there in one stop.  
Let's run down the shopping list here.  Black and olive drab shemagh (that's the neck wrap), black tactical gloves, pistol (or canteen) belt, insignia belt, pants, flag patch, and black combat boots.  In the film Van Zan is clearly wearing two belts and one glove (on the left).  Make sure you get the "blotchy" camouflage pattern pants and not the newer digital camo style.  
I have to modify one part of the costume here.  The tactical gloves all have full fingers.  Those get cut off with scissors, snip snip.

The Hair

Van Zan is bald and carries an epic beard.  Not really; it's kind of blond and scraggly.  Anyway, I've been growing a beard since September for unrelated reasons.  For the costume, I'll shave my head and think about coloring the beard.  It will need to be lightened from my natural reddish-brown to McConaughey's distinctly more blonde color.  

The Ink

Van Zan is heavily tattooed on the upper body.  I'm not currently in the market for tattoos so I'll need to come up with something else.  That alternate method will be body paint.  The internet is full of images good enough to make a stylized representation on myself.  It won't be identical to the movie make-up but, then again, how much of this costume really is?  This will probably mean shaving or even waxing my chest, back, and shoulders so the paint has a good surface to adhere to.  Alas; the indignities I subject myself to for my readers.

Weapons

Van Zan is clearly a well-armed dragon slayer.  He carries a kukri or "gurkha knife", a shorty Mossberg 500 shotgun, an Ultimax 100 Mk. 2 squad automatic weapon, and that ax.  However, I don't want to deal with carrying props while on a Halloween bar-crawl and I definitely don't want to deal with carrying weapons where I'm going.  So I'm going to leave all of these off my costume.  I may craft the ax later to bring to a convention.

Other Props

Two other props are featured in the movie.  First is the metal flask, ironically filled with water.  That's easy enough to buy at any store.  Next up is the dragon's tooth pendant.  I'll have to craft one of those.  Again, we don't need to be photo exact.  The great thing about costuming is that the viewer will fill in and correct any discrepancy on their own if you get it close enough.  

And that's it, my Reign of Fire costume is complete.  Now to go out and enjoy the holiday.
Costume complete